1. 概要
ASUSWRT の OpenVPN で楕円曲線暗号 secp521r1 を使う手順をまとめています。
2. 経緯
悲しい出来事がありました。。。
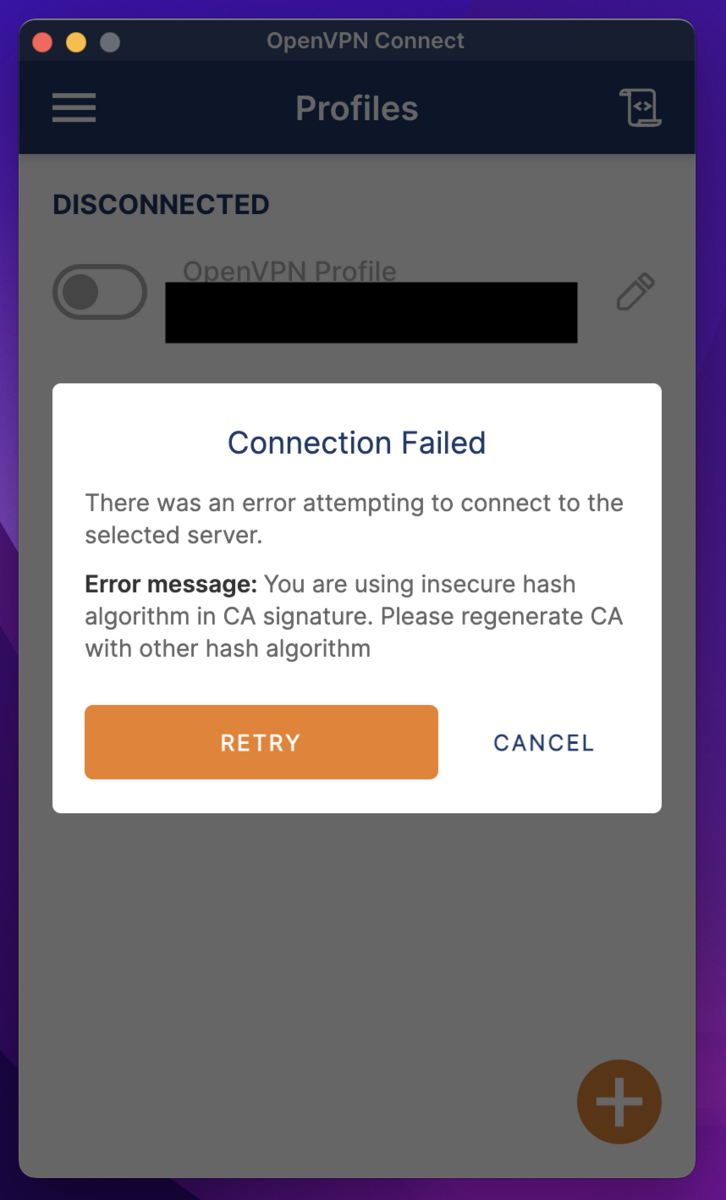
You are using insecure hash algorithm in CA signature. Please regenerate CA with other hash algorithm
OpenVPN の 3.4 のどこかから ASUSWRT のデフォルトの OpenVPN のハッシュアルゴリズムが非推奨になったようです。
- OpenVPN Connect 3.4.0.3121 get insecure hash algorithm in CA signature error - OpenVPN Support Forum
クライアント側で insecure オプションをつけてもいいのですが、せっかくなので証明書を更新することにしました。
3. 手順
3.1 ASUSWRT の OpenVPN のバージョンの確認
※ 書いてから気付きましたが version 知らなくても問題ありません
OpenVPN の起動時や更新時にルータの管理画面のシステムログに OpenVPN のバージョンを含むログが流れます。

あるいは SSH や TELNET でルータに入って openvpn --version でも確認できます。
# openvpn --version
OpenVPN 2.4.11 arm-buildroot-linux-gnueabi [SSL (OpenSSL)] [LZO] [LZ4] [EPOLL] [MH/PKTINFO] [AEAD] built on Jan  5 2022
library versions: OpenSSL 1.1.1k  25 Mar 2021, LZO 2.03
~
3.2 対応する暗号化方式の確認
openvpn --show-curves で対応する楕円曲線暗号を確認できます。
# openvpn --show-curves
Available Elliptic curves:
secp112r1
secp112r2
secp128r1
secp128r2
secp160k1
secp160r1
secp160r2
secp192k1
secp224k1
secp224r1
secp256k1
secp384r1
secp521r1
prime192v1
prime192v2
prime192v3
prime239v1
prime239v2
prime239v3
prime256v1
sect113r1
sect113r2
sect131r1
sect131r2
sect163k1
sect163r1
sect163r2
sect193r1
sect193r2
sect233k1
sect233r1
sect239k1
sect283k1
sect283r1
sect409k1
sect409r1
sect571k1
sect571r1
c2pnb163v1
c2pnb163v2
c2pnb163v3
c2pnb176v1
c2tnb191v1
c2tnb191v2
c2tnb191v3
c2pnb208w1
c2tnb239v1
c2tnb239v2
c2tnb239v3
c2pnb272w1
c2pnb304w1
c2tnb359v1
c2pnb368w1
c2tnb431r1
wap-wsg-idm-ecid-wtls1
wap-wsg-idm-ecid-wtls3
wap-wsg-idm-ecid-wtls4
wap-wsg-idm-ecid-wtls5
wap-wsg-idm-ecid-wtls6
wap-wsg-idm-ecid-wtls7
wap-wsg-idm-ecid-wtls8
wap-wsg-idm-ecid-wtls9
wap-wsg-idm-ecid-wtls10
wap-wsg-idm-ecid-wtls11
wap-wsg-idm-ecid-wtls12
Oakley-EC2N-3
Oakley-EC2N-4
brainpoolP160r1
brainpoolP160t1
brainpoolP192r1
brainpoolP192t1
brainpoolP224r1
brainpoolP224t1
brainpoolP256r1
brainpoolP256t1
brainpoolP320r1
brainpoolP320t1
brainpoolP384r1
brainpoolP384t1
brainpoolP512r1
brainpoolP512t1
本来なら ed25519 を使いたいところですが、対応していないので今回は secp521r1 を利用します。
3.3 証明書・秘密鍵の作成
ASUSWRT の OpenVPN 設定には下記のものが必要になります。
OpenVPN が提供している Easy-RSA というツールを使って作成していきます。
brew や apt などのパッケージマネージャで簡単に入りますのでインストールしてください。
3.3.1 /etc/easy-rsa/vars の設定
vars ファイルに書いておくことで毎回引数に書くことなくオプションが指定できます。
今回使用した vars ファイルは下記です。
set_var EASYRSA_DIGEST "sha512"  # Default sha256
set_var EASYRSA_ALGO  ec
set_var EASYRSA_CURVE secp521r1
set_var EASYRSA_CERT_EXPIRE    36500
set_var EASYRSA_CA_EXPIRE      36500
ASUS ルータのリプレイスまで同じ証明書を使いたいため、有効期限は100年としています。
PATH は環境によって異なると思いますので、よしなに読み替えてください。
参考までに MacOS で brew でインストールした場合には /opt/homebrew/etc/easy-rsa/vars になります。
3.3.2 認証局の初期化
$ easyrsa init-pki

WARNING!!!

You are about to remove the EASYRSA_PKI at:
* /opt/homebrew/etc/pki

and initialize a fresh PKI here.

Type the word 'yes' to continue, or any other input to abort.
  Confirm removal: yes

* SECOND WARNING!!!

* This will remove everything in your current PKI directory.
  To keep your current settings use 'init-pki soft' instead.
  Using 'init-pki soft' is recommended.

Type the word 'yes' to continue, or any other input to abort.
  Remove current 'vars' file? yes


Notice
------
'init-pki' complete; you may now create a CA or requests.

Your newly created PKI dir is:
* /opt/homebrew/etc/pki

Using Easy-RSA configuration:
* /opt/homebrew/etc/easy-rsa/vars
3.3.3 認証局の作成
$ easyrsa build-ca nopass
Using Easy-RSA 'vars' configuration:
* /opt/homebrew/etc/easy-rsa/vars

Using SSL:
* /opt/homebrew/opt/openssl@3/bin/openssl OpenSSL 3.1.2 1 Aug 2023 (Library: OpenSSL 3.1.2 1 Aug 2023)
-----
You are about to be asked to enter information that will be incorporated
into your certificate request.
What you are about to enter is what is called a Distinguished Name or a DN.
There are quite a few fields but you can leave some blank
For some fields there will be a default value,
If you enter '.', the field will be left blank.
-----
Common Name (eg: your user, host, or server name) [Easy-RSA CA]:

Notice
------
CA creation complete. Your new CA certificate is at:
* /opt/homebrew/etc/pki/ca.crt
3.3.4 DH パラメータ作成
$ easyrsa gen-dh
Using Easy-RSA 'vars' configuration:
* /opt/homebrew/etc/easy-rsa/vars

Using SSL:
* /opt/homebrew/opt/openssl@3/bin/openssl OpenSSL 3.1.2 1 Aug 2023 (Library: OpenSSL 3.1.2 1 Aug 2023)
Generating DH parameters, 2048 bit long safe prime
..........................+...................................+..............................+............................................................................................................................................................+...............+.......................................................................................................................................................+.........................................................+................+...........+..............................................
~
+*++*++*++*++*++*++*++*++*++*++*++*++*++*
DH parameters appear to be ok.

Notice
------

DH parameters of size 2048 created at:
* /opt/homebrew/etc/pki/dh.pem
3.3.5 サーバ証明書・秘密鍵作成
$ easyrsa build-server-full server nopass
Using Easy-RSA 'vars' configuration:
* /opt/homebrew/etc/easy-rsa/vars

Using SSL:
* /opt/homebrew/opt/openssl@3/bin/openssl OpenSSL 3.1.2 1 Aug 2023 (Library: OpenSSL 3.1.2 1 Aug 2023)
-----

Notice
------
Private-Key and Public-Certificate-Request files created.
Your files are:
* req: /opt/homebrew/etc/pki/reqs/server.req
* key: /opt/homebrew/etc/pki/private/server.key

You are about to sign the following certificate:
Request subject, to be signed as a server certificate
for '36500' days:

subject=
    commonName                = server

Type the word 'yes' to continue, or any other input to abort.
  Confirm request details: yes

Using configuration from /opt/homebrew/etc/pki/openssl-easyrsa.cnf
Check that the request matches the signature
Signature ok
The Subject's Distinguished Name is as follows
commonName            :ASN.1 12:'server'
Certificate is to be certified until Aug 27 19:13:27 2123 GMT (36500 days)

Write out database with 1 new entries
Database updated

Notice
------
Certificate created at:
* /opt/homebrew/etc/pki/issued/server.crt

Notice
------
Inline file created:
* /opt/homebrew/etc/pki/inline/server.inline
3.3.6 クライアント証明書・秘密鍵作成
$ easyrsa build-client-full client nopass
Using Easy-RSA 'vars' configuration:
* /opt/homebrew/etc/easy-rsa/vars

Using SSL:
* /opt/homebrew/opt/openssl@3/bin/openssl OpenSSL 3.1.2 1 Aug 2023 (Library: OpenSSL 3.1.2 1 Aug 2023)
-----

Notice
------
Private-Key and Public-Certificate-Request files created.
Your files are:
* req: /opt/homebrew/etc/pki/reqs/client.req
* key: /opt/homebrew/etc/pki/private/client.key

You are about to sign the following certificate:
Request subject, to be signed as a client certificate
for '36500' days:

subject=
    commonName                = client

Type the word 'yes' to continue, or any other input to abort.
  Confirm request details: yes

Using configuration from /opt/homebrew/etc/pki/openssl-easyrsa.cnf
Check that the request matches the signature
Signature ok
The Subject's Distinguished Name is as follows
commonName            :ASN.1 12:'client'
Certificate is to be certified until Aug 27 19:14:39 2123 GMT (36500 days)

Write out database with 1 new entries
Database updated

Notice
------
Certificate created at:
* /opt/homebrew/etc/pki/issued/client.crt

Notice
------
Inline file created:
* /opt/homebrew/etc/pki/inline/client.inline
3.3.7 成果物の確認
下記は MacOS の場合のそれぞれのファイルのパスです。
easyrsa コマンドの実行結果にご自身の成果物のパスがありますので読み替えてください。
- CA 証明書:
/opt/homebrew/etc/pki/ca.crt - CA 秘密鍵:
/opt/homebrew/etc/pki/private/ca.key - サーバ証明書:
/opt/homebrew/etc/pki/issued/server.crt - サーバ秘密鍵:
/opt/homebrew/etc/pki/private/server.key - DH パラメータファイル:
/opt/homebrew/etc/pki/dh.pem - クライアント証明書:
/opt/homebrew/etc/pki/issued/client.crt - クライアント秘密鍵:
/opt/homebrew/etc/pki/private/client.key
3.4 ASUS ルータに配置
ASUS のルータの OpenVPN の証明書や秘密鍵は /jffs/openvpn/ に格納されています。
# ll /jffs/openvpn/
-rw-rw-rw-    1 admin    root           851 Sep 21 03:13 vpn_crt_server1_ca
-rw-------    1 admin    root           384 Sep 21 03:14 vpn_crt_server1_ca_key
-rw-rw-rw-    1 admin    root          3172 Sep 21 03:14 vpn_crt_server1_client_crt
-rw-------    1 admin    root           384 Sep 21 03:14 vpn_crt_server1_client_key
-rw-rw-rw-    1 admin    root          3289 Sep 21 03:15 vpn_crt_server1_crt
-rwxr-xr-x    1 admin    root           428 Sep 21 03:15 vpn_crt_server1_dh*
-rw-------    1 admin    root           384 Sep 21 03:15 vpn_crt_server1_key
この位置に 3.3 で作ったファイルをコピー、または編集して書き込んでください。
3.5 ASUS ルータの OpenVPN の再起動
ルータの OpenVPN の管理画面の Apply ボタンを押すことで何も変更がなくても OpenVPN が再起動されます。

3.6 接続確認
OpenVPN 設定ファイルをエクスポートして、OpenVPN クライアントから接続できれば完了です。
4. 所感
ASUSWRT の OpenVPN の証明書変更を UI から何度やっても上手く動作しない OpenVPN 設定ファイルしか吐かないので、証明書を置き換えることで解決しました。どなたかの参考になれば幸いです。